How to Claim a Business Page on Facebook
Big or small, having a strong online presence is important for any business, especially on social media heavyweights like Facebook. We can’t emphasize this enough, Facebook, with over 3 billion monthly active users, is the most influential platform in town and plays a key role in shaping your business’s image (Statista).
In this guide, we’ll walk you through how to claim a business page on Facebook like a pro, whether you’re choosing to start from scratch or trying to revamp an existing page.
Generate 5-star Facebook reviews for your business automatically
How to Create a Facebook Business Page with a Personal Facebook Account
Step 1: Access your Personal Facebook Account
Log in to your personal Facebook account.
Step 2: Navigate to the Create Button
In the top-right corner, click on the Create button (represented by an icon with 9 small dots).
Step 3: Choose “Page” from the Pop-up Menu
Select the Page option from the pop-up menu or use the direct link: Create A Facebook Page.
Step 4: Complete Page Setup
Input your page name, category, and description. From there, you can preview how your page will appear on desktop and mobile. Once you are happy with how things look, click Create Page to complete the setup.
For more in-depth guidance on best practices for creating and filling out a new Facebook business page, check out our guide on How to Create a Facebook Business Page.
How to Claim an Existing Facebook Business Page With a Personal Facebook Account
Claiming an existing page can be challenging, especially with the removal of the “Is this your business?” option. However, not all hope is lost. Let’s look at some strategies you can try.
Contact the Administrator
If the page is claimed and has an administrator, reach out directly to them. Ask them to follow the steps outlined here to remove the page from their Facebook account and grant ownership to you.
Unable to Contact Admin? Prove Ownership
Hearing crickets from the administrator? Another way you can gain control of the business page is by gathering proof of business ownership to validate your claims through Facebook Business Manager. This would include showing required documentation, such as:
- A valid Government ID matching the name of a page admin.
- Signed statements from the organization, including specific details like:
-
- Clarification of your association with the page
- Identification of the current page manager(s) by name.
- Indication of the relationship between you and the page.
- Elaboration on the nature of your request.
- Identification of the Business Manager who owns the page.
- A statement saying that the requester is unaware of any administrators and can’t contact them.
- Confirmation of the accuracy and truthfulness of the provided information.
- Any other documents supporting the request, such as screenshots or videos.
How to Claim a Facebook Business Page Through Facebook Business Manager
Step 1: Access Business Settings
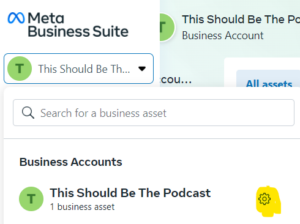
Navigate to Facebook Business Manager settings by selecting the gear icon next to your business account name.
Step 2: Select Business Assets
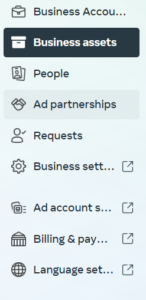
Within the “Accounts” tab, choose “Business Assets” to view all Facebook pages you manage.
Step 3: Claim an Existing Facebook Page
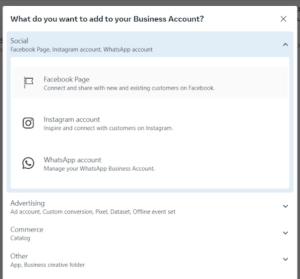
Click Add Assets.
From there, choose the Facebook Page option.
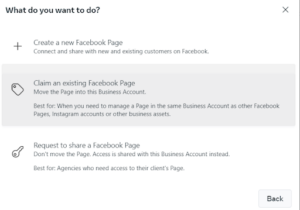
Then choose the Claim an existing Facebook Page option.
Step 4: Complete the Claim Process
Provide the name or URL of the Facebook Page and click Add Page to finalize the claim process.
If the page is already claimed, you can opt to submit a support request through Facebook Business Help. However, don’t be surprised if you don’t hear back, Facebook support is notoriously difficult to get a hold of.
If All Else Fails, Create a New Facebook Page
If claiming proves impossible, and Facebook support remains elusive, it might be time to cut your losses and create a new page.
Before you’re done though, make sure to report the old page to help Facebook take it down sooner. You can do this by:
Step 1: Find Support or Report
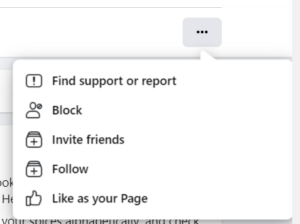
Navigate to the old page and select the three dots on the far right. From there, click on Find support or report.
Step 2: Report the Issue
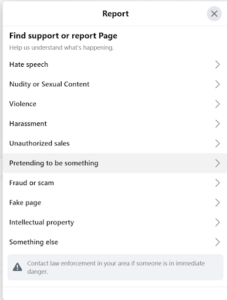
Once Find support or report has been selected, click Pretending to be something from the dropdown menu that appears.
Step 3: Defining the Issue
Once you have hit Pretending to be something, select A business from the list of options available to you. Follow the prompts until you can paste in a link to your new Facebook page, then submit your complaint for review.
How Broadly Helps With Online Reputation for Small Businesses
At Broadly, we understand the significance of a strong online presence for local businesses. Our platform is designed to make it easier for business owners to manage their online reputation. From claiming business listings to gathering positive reviews, Broadly is your partner in building and maintaining a reputation that keeps customers coming back.
Ready to take action on your online reputation? Sign up for a personalized demo!
Transform your local business with revolutionary AI-powered software
